DIY Raspberry Pi ebook reader, part 1 - acquiring hardware
Let’s build
When I digged through ebook readers available on the market, it occured to me that every option is unappealing to me due to lack of customizability. Huge part of it lies in closed-source nature of those devices, which to me as an open source enthusiast is a major turn off. This, coupled with a hunk of free time during summer break, led me to the idea of building my own ebook reader. Happy with having a new project to hone my soldering skills, I enthusiastically set about making preparations.
Goals
To instill some sense of direction into the project, I imagined it would be best to try and reach incremental goals. My first goal would be to connect every element one by one and check if every part works as intended. Next, a stage which will either make or break the whole endeavor, is to put everything together and make sure there are no conflicts between parts. And, for the last part, find some ebook software to actually use the thing, or, in the worst case, write one.
The innards
Core
I want my contraption to be both functional and similar in form to commercial counterparts. It has to be lightweight and handy, while allowing a degree of flexibility in customization. Since I have no infrastracture, means and skills to manufacture custom boards, I am bound to SBCs, which is not at all bad considering saved money and time. Ebook, like tablet or smartphone, is rather slim, which means very limited range of connection ports. There is no space and energy to spare for active cooling, so the chip has to run cold. Frankly, it does not have to be as powerful as aforementioned devices, because its primary purpose is to print text. Taking all that into consideration my vote went to Raspberry Pi Zero W. Arguments for this pick were my familiarity with Raspberry Pis, wealth of documentation and code, a range of ready-made extensions and ease of use. Integrated Wi-Fi allows for smooth hassle-free software deployment while also being a nice feature of the finished project. Model Zero is also much thinner and energy efficient than its full-sized siblings, making it a perfect fit for my application. Another chief asset of Zero is that it is powerful just enough to run a full Linux distribution, so no need to play with low level embedded. I would gladly take version 2, but sadly, they were out of order wherever I looked, and summer break is too short to wait. For convenience, I settled for Raspberry Pi Zero WH, with soldered header.
Power
Much to nobody’s surprise, there are myriad ways to power Raspberry Pi. Obviously, battery power is the only sensible choice, but even that can be done in many ways.
The most barebones solution is to construct appropriate circuit and plug in the source. The upside of it is being able to custom tailor every aspect of power supply. The downside is required knowledge and ease of screwing things up. I never feel confident enough in my tinkering abilities when it comes to powering things, so I immediately discarded this option.
Another popular solution is to cannibalise power bank. This is handy, as powerbanks come with charging module, so you just plug in the cable and you are set. However, powerbanks are often a little bulky and poorly regulated, which would cause a lot of random restarts upon voltage drops. After all, they are meant to store energy, not act as a power supply, so manufacturers could not care less about stability. Another missing thing is feedback - powerbanks do not return their status to devices they power, so going below certain threshold would always cause abrupt shutdown and, over time, murder the SBC.
This leads me to the third option, which is dedicated Raspberry Pi power supply board. These little circuits provide stable voltage, have integrated charger, output battery level and play nicely with Pi, due to the whole HAT design which enables stacking of extension boards.
After quite some time spent on researching the topic and looking through offers I chose DFRobot DFR0528 UPS HAT. It fulfills all my requirements, is quite cheap and available. The official wiki seems to nicely explain how to enable battery level reading.
When it comes to power source, the obvious choice would be either Li-Ion or Li-Pol battery. I wanted something thin, light and capacious, so I chose Li-Pol Akyga 3500 mAh 1S 3,7 V which I found in local eshop. The battery comes with connector cable ready to be soldered to UPS HAT.
Screen
From the beginning it was clear that I want e-paper dispay. E-paper is easy on eyes, legible in sunlight, extremely power efficient and looks cool. In this day and age there is an array of different sizes of e-papers made for Raspberry Pi. Since I want to build a reader, I need quite a lot of surface area, but the bigger the surface, the slower the refresh rate. This is further exacerbated when different colors come into play, where refresh procedure can take up to thirty seconds. This is unacceptable to me, so I decided I am content with fast but b/w display. Finally, I found a nice compromise, Waveshare 800x480 7.5inch E-Ink Display which comes with a HAT. The screen communicates through SPI, has a refresh rate of 5 s, resolution of 800 by 480 pixels and dimensions of 163,2 by 97,92 mm.
Buttons
I almost forgot that in order to actually do stuff with my ebook, I need to control it somehow. For a while I thought I would build something from parts from my local (and physical) shop, until I found Pimoroni Button SHIM, which seems perfect for my use case.
The design
This project takes on highly experimental approach, and I am not much of a planner when it comes to those things. I very much like to get my hands dirty first and construct something that works, then worry about the details (like how to actually put the parts in place). However, perhaps, if I want to write a few blog posts about my adventure, then the usual way of doing things is not very good for that. I should pave a roadmap and pull together some kind of schematic. Without further ado I fired up Blender and made models of my parts.
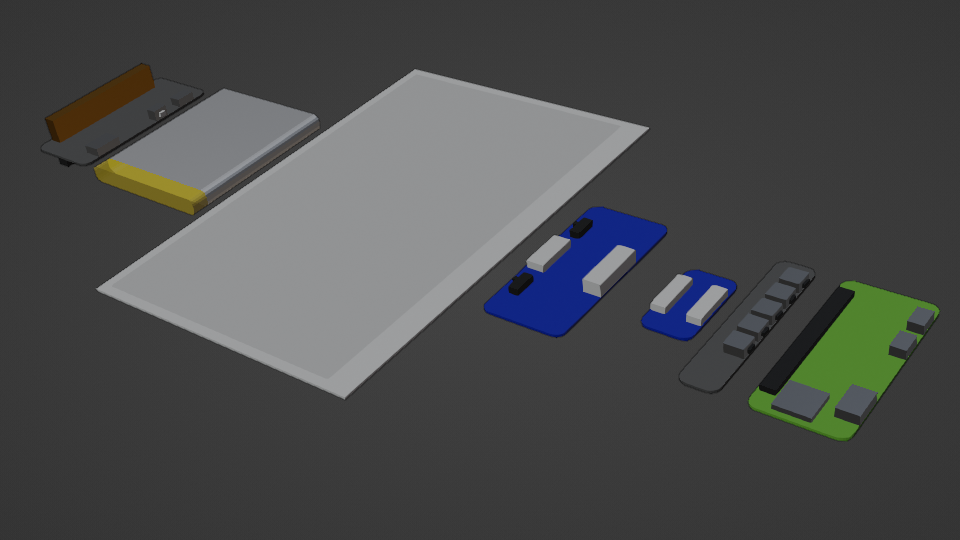 The first thing that is striking is that UPS HAT’s pins are huge, sprouting 1 cm from both sides. This is non-ideal in my case, so I will have to unsolder that thing or find another way to slim down the board.
While the idea of HATs is amazing in its own right, stacking just one extension board on top of Pi makes the whole setup really thick. Luckily, every board uses just a few pins from the whole header, so the idea to connect appropriate pins with cables and position all boards horizontally is not completely bonkers. To further slim down the setup and to get better access to Pi pins, I chose to solder button SHIM to the underside. I had to keep all boards with buttons and ports at the edge and also remember not to strain the FFC cable too much. Taking all that into consideration I attempted to make a draft in Blender and am pretty happy with the looks of it.
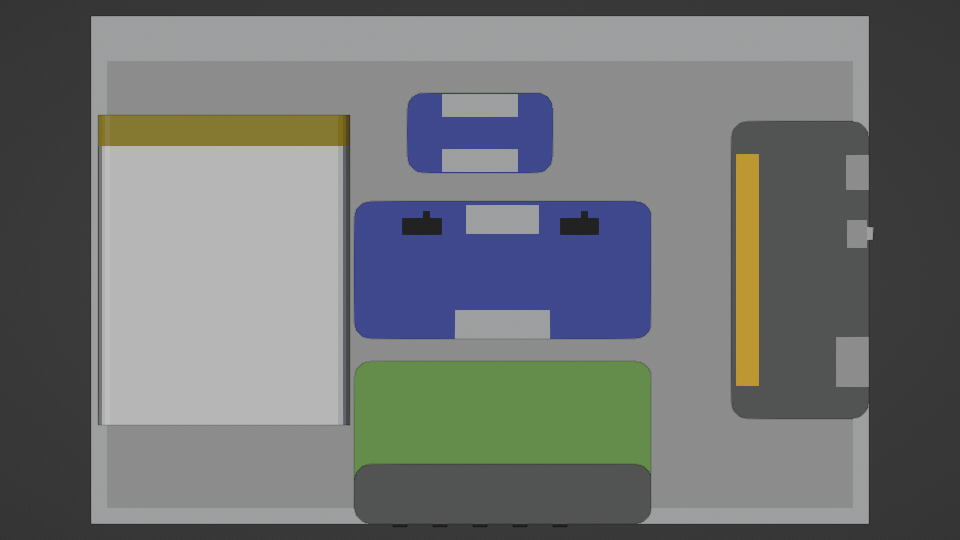
The layout feels a bit off, because Raspberry Pi with its button shim are positioned to align the middle button with the center of the screen; likewise, e-paper connector is aligned with screen tape at the top (not rendered).
Closing remarks
After fruitful team participation in robot competition I felt like taking up a solo project this time. I wanted to actually learn the process of doing project from start to finish, but now on my own terms. Ebook reader involves just a few parts, does not require much soldering, and poses a great opportunity to get a hands-on experience in electronics.
In the next step I will install and configure the OS, set up development environment, install necessary libraries and test all acquired boards.